
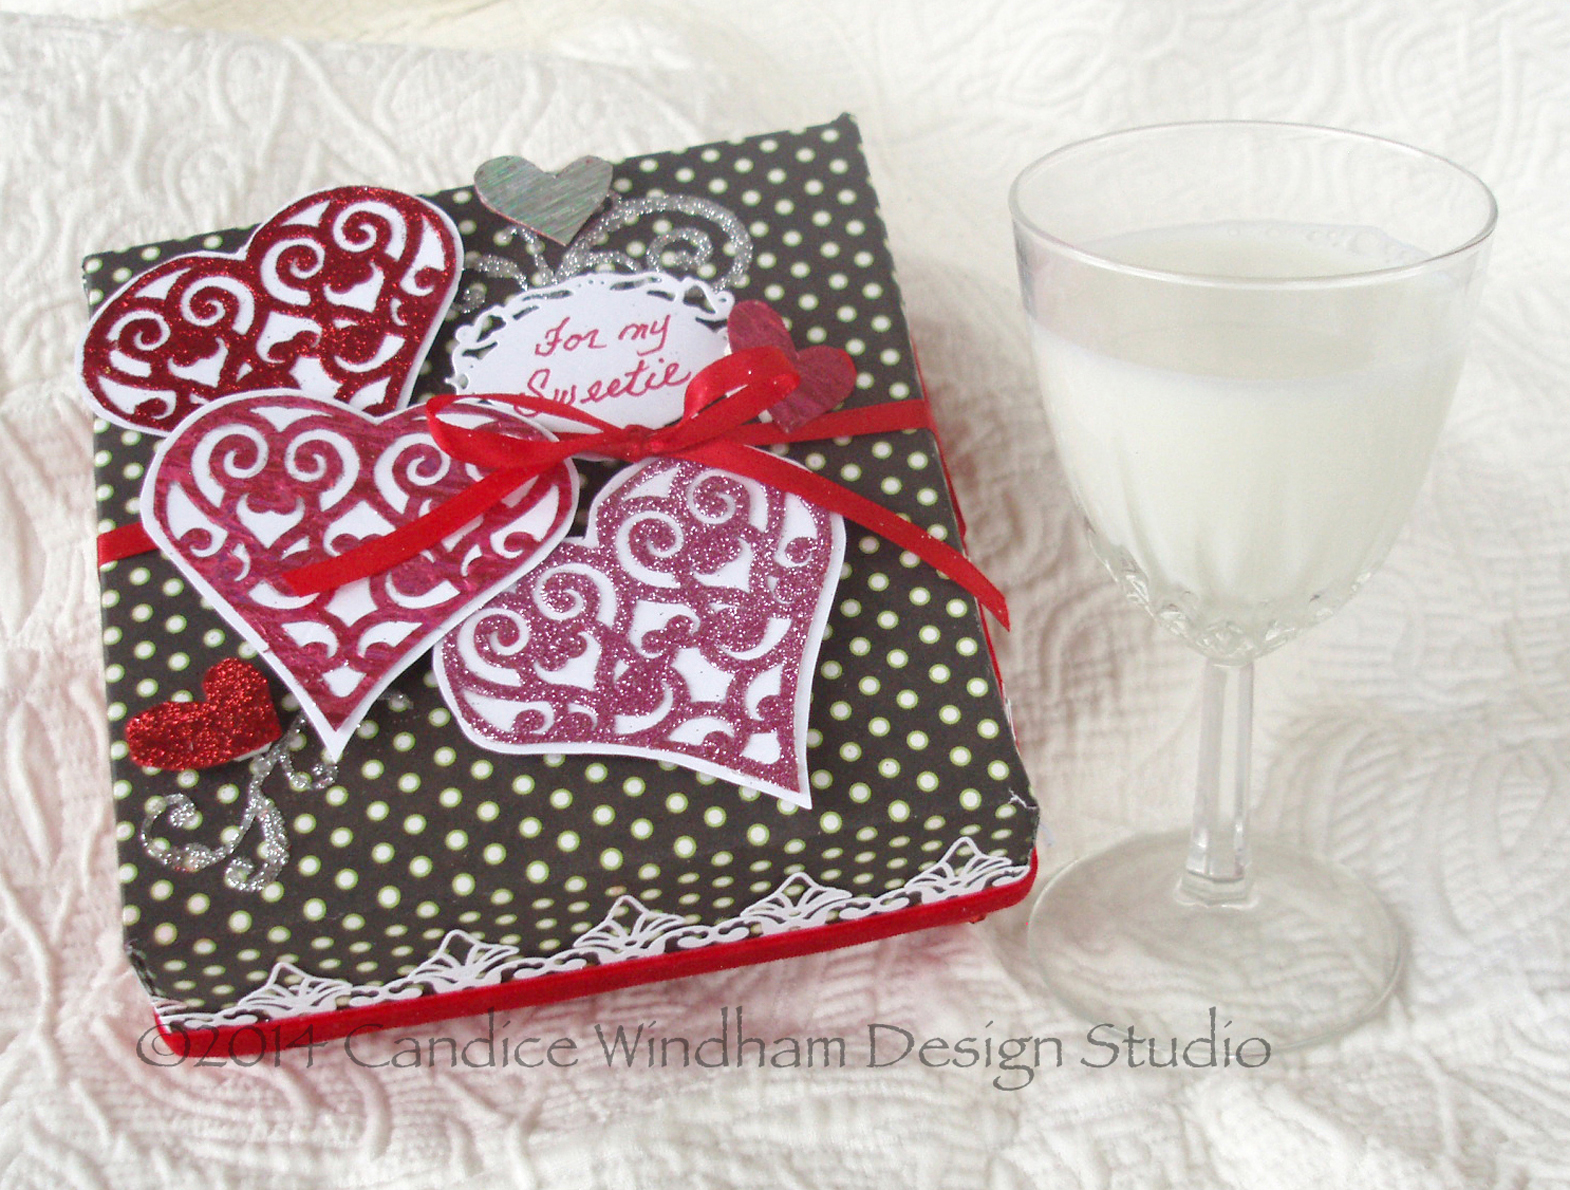
There’s a sweet surprise inside this custom-made gift box!
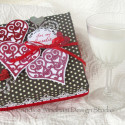
Don’t you just love Valentine’s Day? I can’t think of any sweeter day on earth, than the day set aside to tell our loved ones that they are, well…loved! My sweetie will love these chocolate chip cookies along with a cold glass of milk – and what better way to present them than with a custom-made box. It took a little longer to make the box than to bake the cookies, but I think it was well worth the effort. Once you get the swing of hinging your box parts, it’s easy. I also used this construction technique to build a Christmas Cottage. (See it here.)
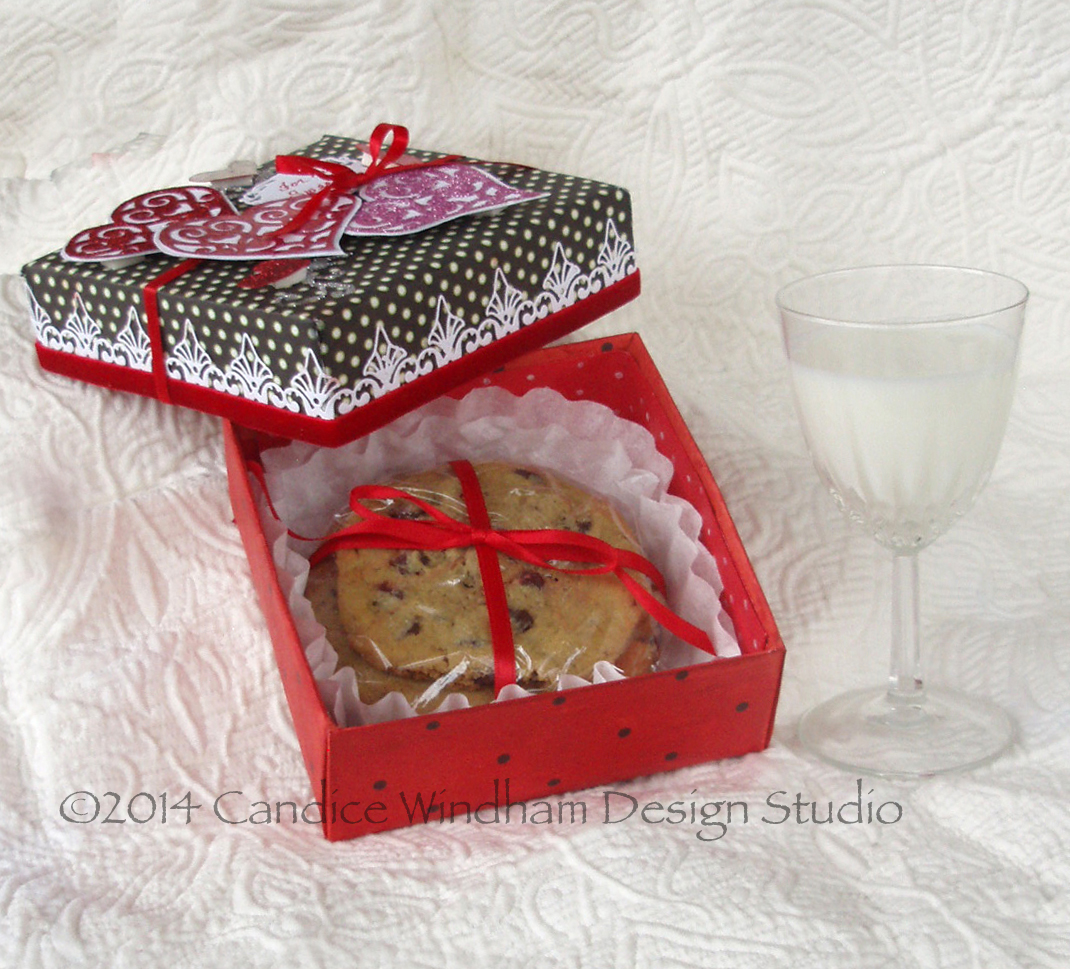
Three big chocolate chip cookies fit nicely inside.
The basis of this box is chipboard. If you only have the thinner chipboard, just double the pieces for a more sturdy box. You can also use mat board or book board. KoolTak ™ adhesives provide the strength to hold all the elements and dress them up as well.
Supplies
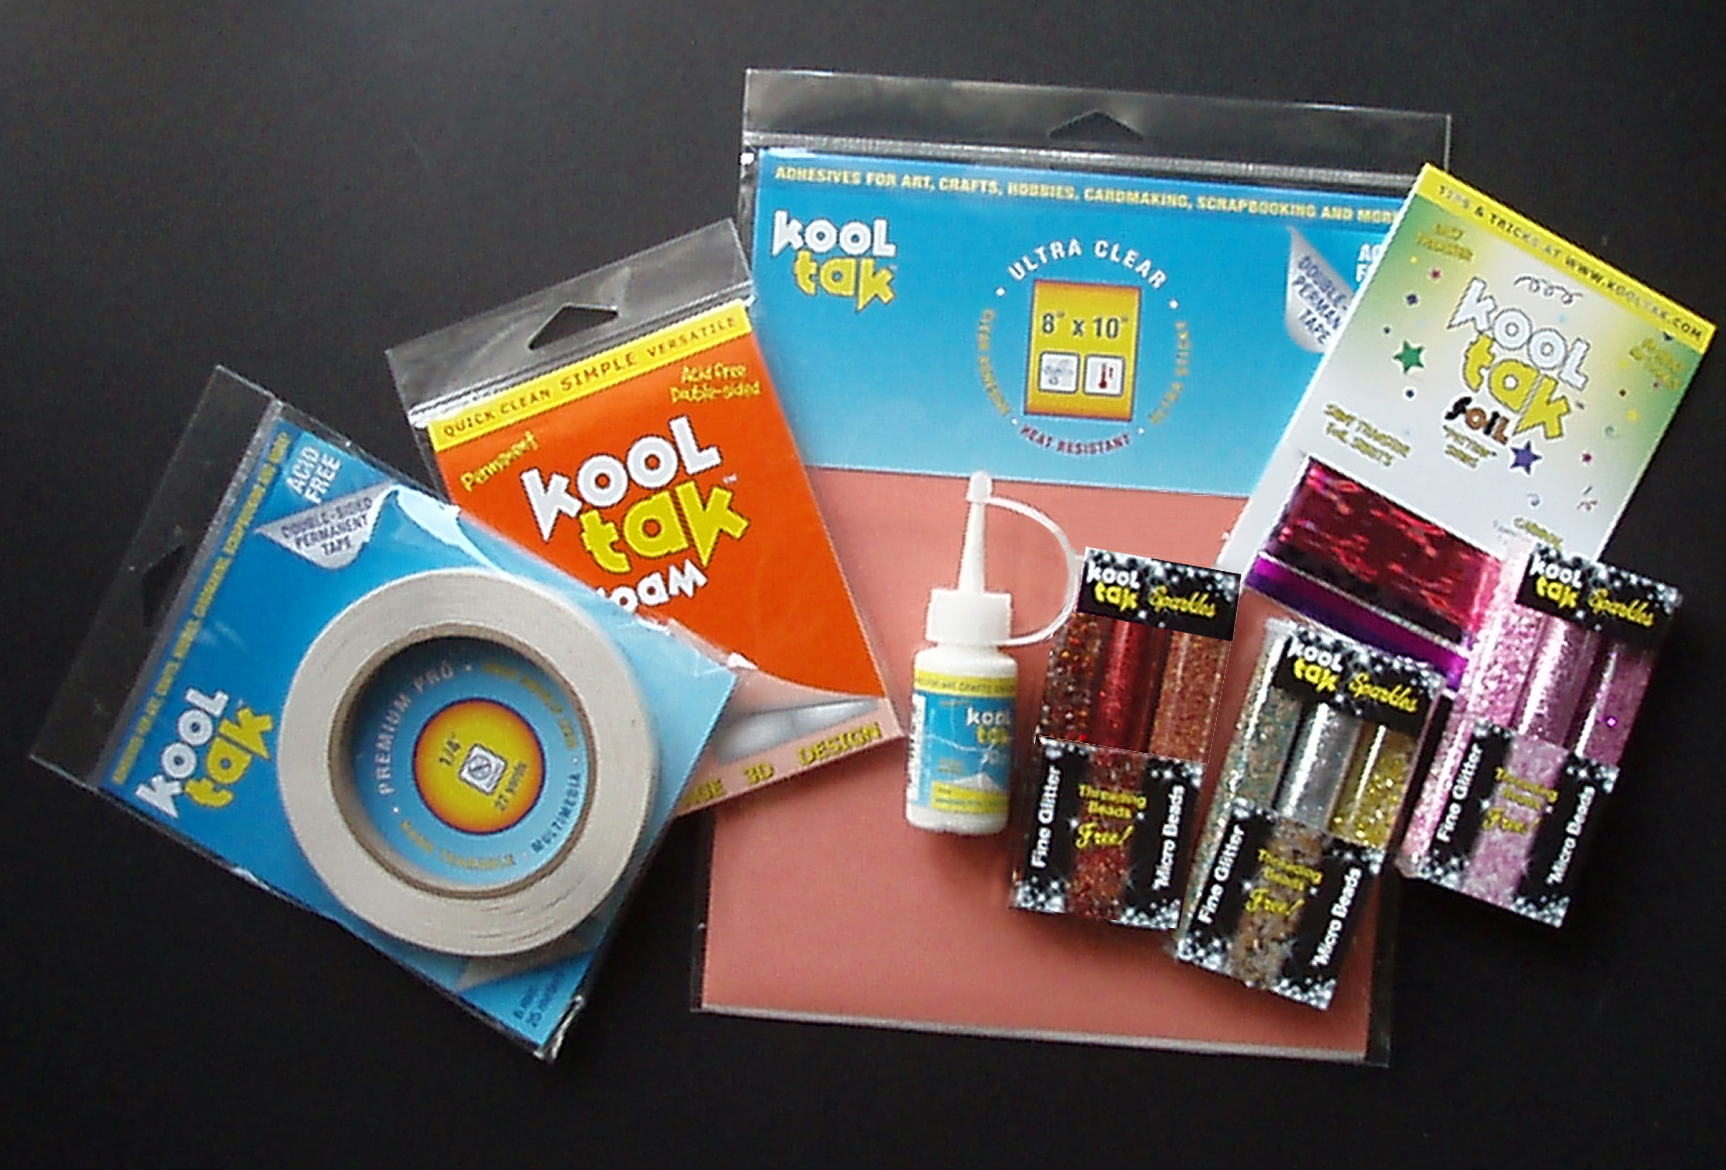
- Kool Tak™ Ultra Clear 8″ x 10″ sheets (pack of 3)
- Kool Tak™ Premium Pro 1/4″ Tape
- Kool Tak™ 3D Foam Pads, 1″ x 1/2″ x 1/8″
- Kool Tak™ Sparkles – Red
- Kool Tak™ Sparkles – Silver
- Kool Tak™ Sparkles – Pink
- Kool Tak™ 3D Glue
- Kool Tak™ Shiny Transfer Foils – Pattern Series – Carnival
PLUS:
- Chipboard
Note: Size is based on a 5″ cookie, but you can adjust to make the box fit whatever size you have. Remember to double the pieces if you are using light-weight chipboard
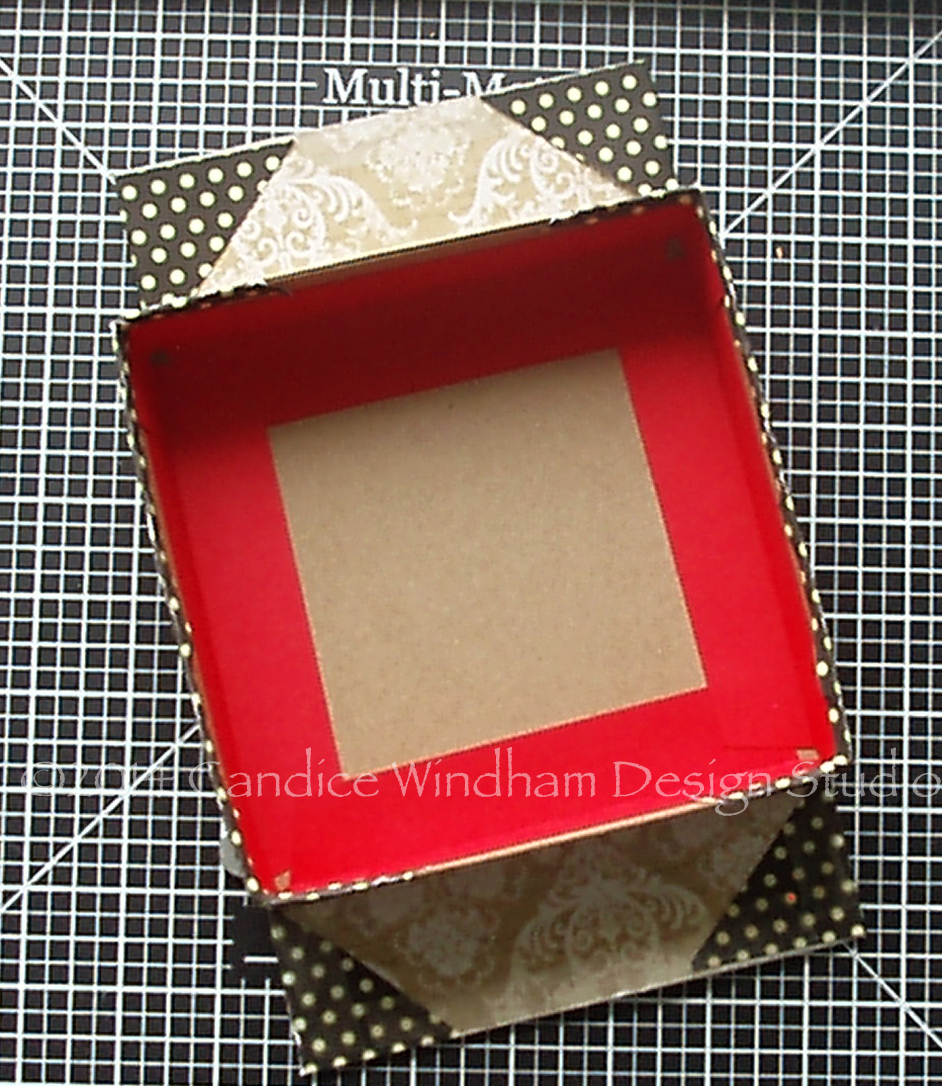
For box lid: One 5 3/4″ square, four 5 1/4″ x 1 1/2″” rectangles, one 5 5/8″ square for liner
For box bottom: One 5 1/2″ square, four 5 1/2″ x 2″ rectangles, one 5 1/4″ square for liner
- Patterned Paper
Note: While printed card stock may be sturdier, patterned paper won’t add a lot of bulk, which is important for your box lid to fit the bottom without binding. It will also make those folded edges a lot smoother.
For box lid: 9 3/4″ square of one pattern for outside of box, two 12″ x 2″ for side liner, one 6 1/2″ to cover liner chipboard
For box bottom: 9 1/2″ square of one pattern for outside of box, two 12″ x 3″ for side liner, one 6 3/8″ to cover liner chipboard
Note: This is a good way to use up scraps of patterned paper. Just mix and match your papers. If the colors don’t exactly match, use and ink pad or spritzer to change the color. I used four different papers and tinted one to make the red a more pleasing color to match my ribbon.
- Card stock, white, pink and red, approximately one sheet of 8 1/2″ x 11″ of each for die cuts. You can also use scraps here as well.
- Die Cuts: Swirl Heart; Opulent Ovals; Venetian Accents; Charmed, I’m Sure (Spellbinders)
- Perfect Crafting Pouch
- Red velvet ribbon, 1/4″x 48″
- Red satin ribbon, 1/8″ x 24″
- Coffee filters, 2 Large
Note: use the large restaurant size filters (approximately 5″ center circle) for this size box. Just trim about 1 1/2″ off the pleated edge. For a smaller box, regular pleated filters will work.
- Tools: Plastic Wrap, Scissors, Red Sharpie
Directions
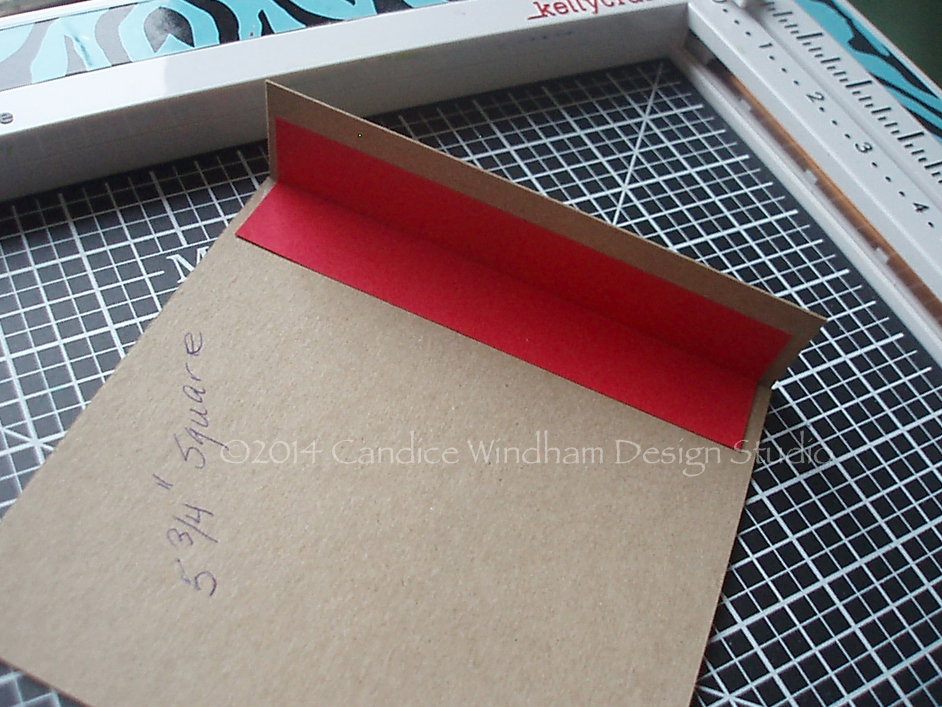
1. Cut red card stock into 1″ x 5 1/2″ strips. Score down the center of each and fold to 1/2″ x 5 1/2″. Place 1/4″ Kool Tak ™ Premium Pro tape along both sides of each fold to make hinges. You will need at least eight hinges. You can also use small pieces to hinge each corner as I did, but the Kool Tak™ adhesive and cover papers make the box very secure without them.
2. Make the box bottom and top using one hinge on each edge.
Use hinge to connect box top sides to the box top lid .
3. Cover and finish both pieces. The directions are for the lid with the bottom pieces in parenthesis.
Center the lid (bottom) on the 9 3/4″ ( 9 1/2″) sheet of patterned paper and adhere to the paper with a small piece of Kool Tak ™ Premium Pro. Add a strip of Kool Tak ™ Premium Pro along each edge of the patterned paper. Cut each corner of the paper to the corner of the box.
Adhere box to center of cover paper.
Remove the release paper on two opposite sides of box. Fold each of the two sides up and wrap the corners around the box sides. Clip the corners of the paper to make folding the paper edge down inside the box easier.
Fold remaining flaps in, add additional Premium Pro adhesive and then fold up and over the edge.
Remove the remaining release paper and fold the pointed flaps in, keeping the edge straight across on the fold. Apply additional Kool Tak ™ Premium Pro adhesive to the newly created edge, then fold the remaining sides up and over into the box.
Cover the remaining 5 1/2″ (5 1/4″) square in patterned paper.
Fold down the top edge 1/2″ and apply Premium Pro.
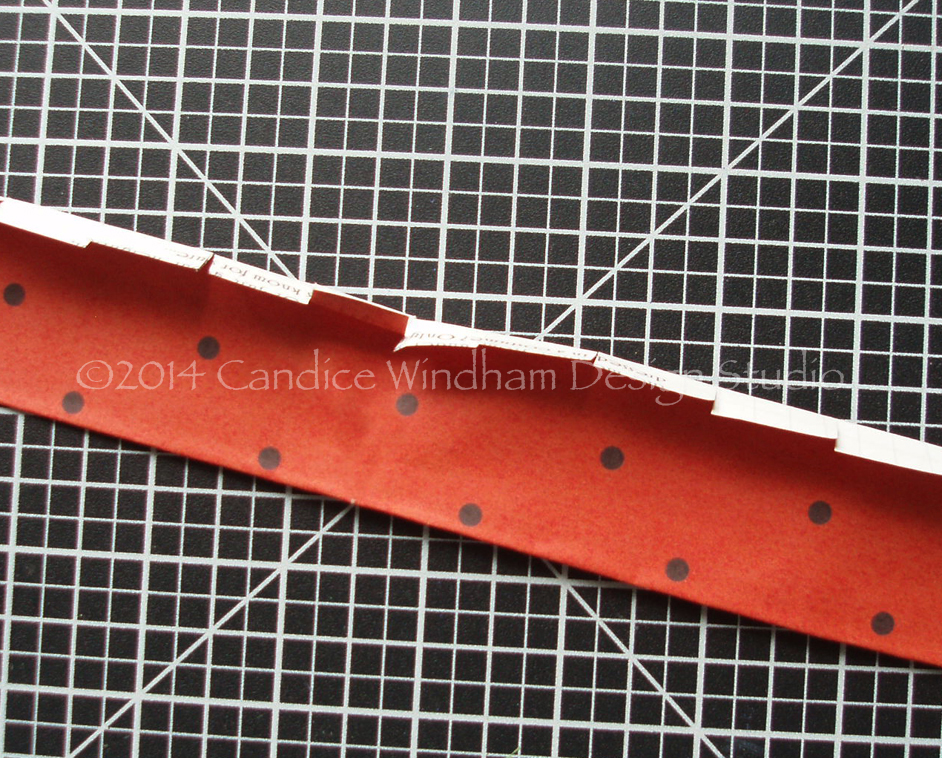
Fold the lower edge up and clip it to the fold every 1/2″.
Fold the long edge down on the 12″ strips. Add Kool Tak ™ Premium Pro adhesive to the folded edge. Fold the bottom edge up and clip it every 1/2″ or so. Begin adhering the strip in one edge of the box and continue around until you have adhered it all. Fold the short end of the second trim piece in about 1/4″ and begin adhering it in the corner where you ended the last piece. When you get to the final corner, trim the edge and fold it under, adhering with Kool Tak ™ Premium Pro. Add a couple of strips of Kool Tak ™ Premium Pro to the covered liner square and place it in the box to cover the clipped edges of the side liner.
Finishing lid
Cut swirl from Kool Tak ™ Ultra Clear Sheet using the Spellbinder Grand Calibur. Cut the piece so that you can have one swirl at two opposite corners. remove one release paper and apply the swirl pieces directly to the box. Rub the Perfect Crafting Pouch around the swirl to keep glitter from adhering where you don’t want it. Remove the remaining release paper,cover the adhesive with silver glitter and tap it off.
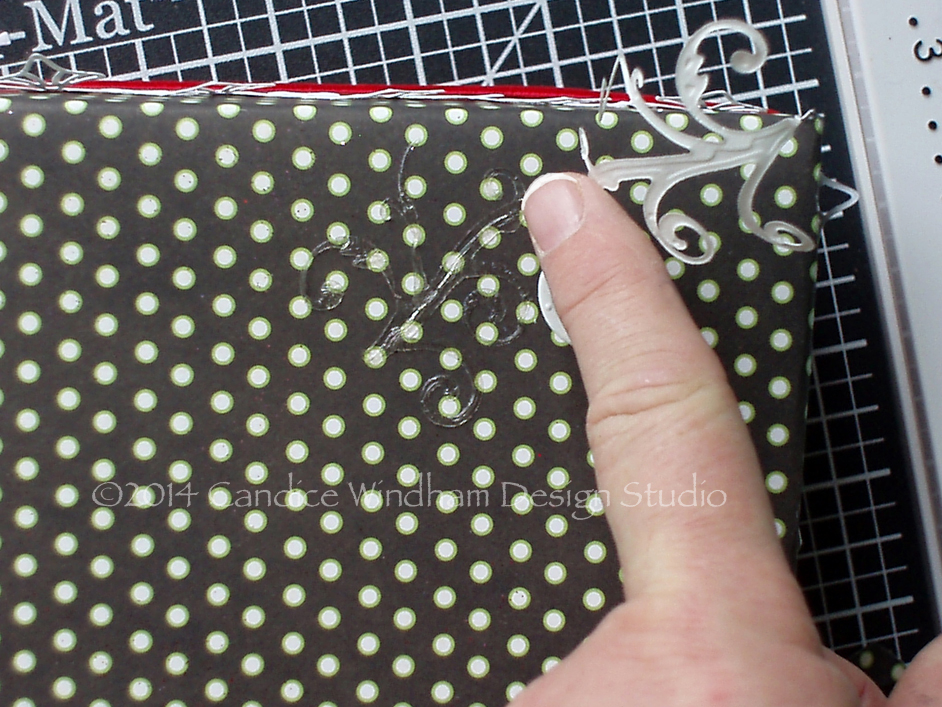
Apply swirls to box lid.
Cut hearts three large, three small, from pink card stock. Apply Kool Tak ™ 3D Glue to the three large hearts, cover one in Kool Tak ™ Sparkles pink glitter, one in Kool Tak ™ Sparkles red glitter and one in pink Kool Tak ™ Carnival foil. Apply Kool Tak ™3D Glue to the three small hearts, covering one in Kool Tak ™ Sparkles red glitter and two remaining in silver Kool Tak ™ Carnival Foil and pink Kool Tak ™ Carnival foil.
Cut oval frame and write your sentiment inside with a red Sharpie. Attach to the box lid with Kool Tak ™Premium Pro. Cut Kool Tak ™ Foam pieces into appropriate sizes for hearts and apply all to box lid.
Cut two lace borders from white card stock. Apply Kool Tak ™ Premium Pro around the box lid, approximately 1/4″ from edge. Apply Kool Tak ™ Premium Pro around the box lid again, covering the top edge of the lave border. Attach red velvet ribbon all around the edge.
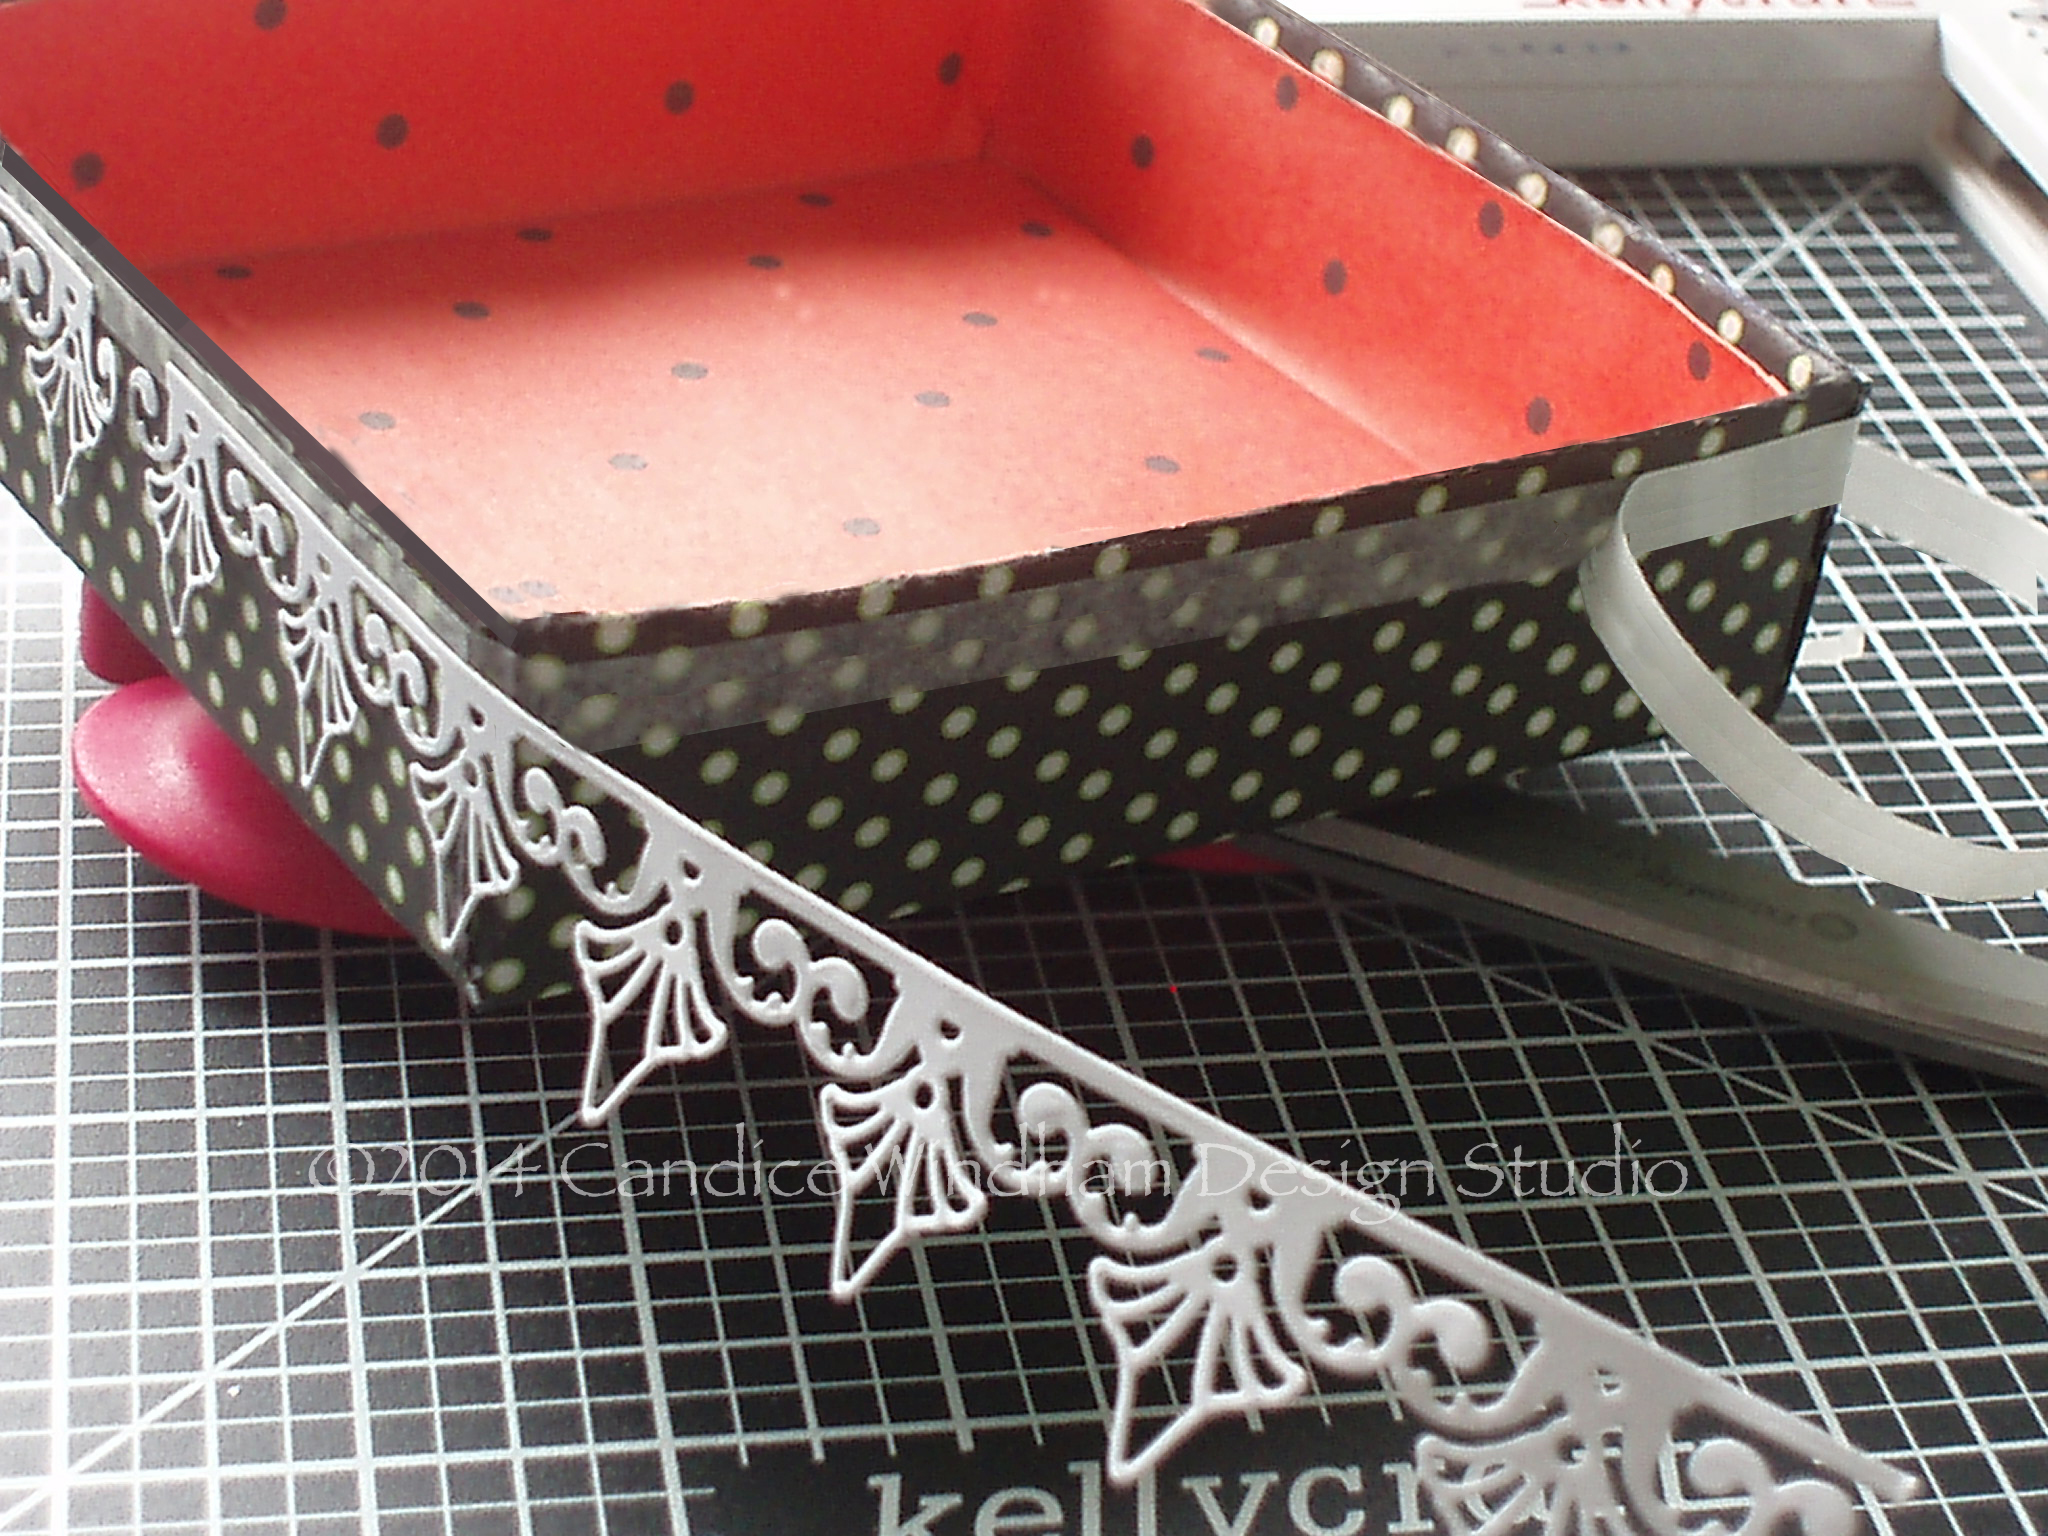
Attach paper lace trim.
Cut enough red satin ribbon to circle the box lid and tie a bow. Apply approximately 8″ of 1/4″ Kool Tak ™ Premium Pro to the center of the ribbon, with 4″ on either side of the center line. Attach the ribbon inside the box lid and, threading it under the hearts, bring it up over the top to tie in a bow.
Wrap the cookies in plastic wrap and tie with red ribbon. Trim about an inch off the edges of the two large coffee filters, place in the bottom of the box and nestle your sweet surprise inside.
There are a lot of steps in this construction method, but the more of these you make, the easier it will become.
Just imagine the look on the face of your sweetheart when you present this box. You’ll be the the sweetest person in the world. Add a glass of ice cold milk and you’ll be a genius. – Candice